
A NEW TWIST ON THE OLD!
MY NEW FAVORITE THING TO DO!
When I saw how to transpose a photo to wood I was hooked…no more just framing photos for me!
The possibilities took off from there…like transposing photos onto glass!
 |
| From CraftBlog2 |
Supplies needed for both wood and glass:
Photo to Transpose, Wood or Glass Surface, Gel Medium, Water, Mod Podge
 |
| From CraftBlog2 |
—
 |
| From CraftBlog2 |
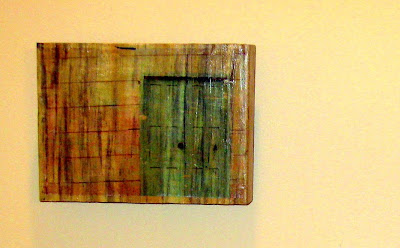
I saved the below leaded glass kitchen cabinet door from a kitchen remodel in an old house we used to own. I knew one day I would do something cool with it and I think the time has come.
Since I love to do photography, my first idea was to just put photos in the squares, until I learned about this transposing photos business!
 |
| From CraftBlog2 |
I was staring at the leaded glass door and it came to me…can I do that to glass too? And as you can see by my first photo…you can!
And here is how to do it yourself!
1) Get surface!
This particular post is for wood or glass surfaces. But check out this link for other surfaces: Image Transfer Methods
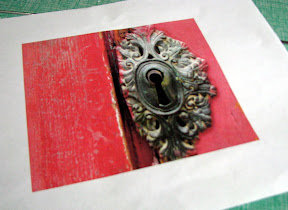
2) Pick Photos / Images!
This was not an easy task for me, but I managed to get down the pile to 16 for the 12 spots!
 |
| From CraftBlog2 |
3) Size the photos!
My not so square sections in the leaded glass cabinet door were not typical, so I was forced to finally use Photo Shop to size and print them out. I have been wanting to learn the program my husband so lovingly gave to me a year ago, so although I went through a frustrating period, I am glad I learned how to do at least one thing on it!
 |
| From CraftBlog2 |
4) Print the photos!
The images need to be on regular printer/copier paper. The tutorial I saw did not tell me, so i tried it with a real photo first ending in a non-craft craft. Either coping the photos or laser printing them out will do. Although I have done the above photo with an ink jet, so that works too. For my final product I will either copy or laser print them out as I hear the color is more brilliant after the transposing is done.
5) Spread Gel Medium evenly onto surface!
Lay image face down onto surface making sure there are no bubbles. Let dry over night.
 |
| From CraftBlog2 |
6) Wet the surface!
When surface is completely dry, wet the surface with water. Better to use a paper towel or just your fingers to do so…I do not recommend the mess you may make by pouring as it looks like in the below photo!
 |
| From CraftBlog2 |
7) Remove the paper!
Once fully wet, start to rub the paper with your finger tips. I would do so gingerly as you may rub the image off as well. With that said, it is a bit harder with. I use rubber tipped gloves as your fingertips can get sore if the surface is large! Also, with wood the transposed photo is on the front of your wood and you need to remove all the paper for it to look its best. With glass, the transposed side will most likely be on the back, so I did not take all of the paper off in areas I wanted it to be darker.
 |
| From CraftBlog2 |
8) Finish the surface!
To seal or put a finished look on the surface, spread Mod Podge over the surface where the image was transfered and let dry.
 I
I
THE FINISHED PRODUCT WITH SOME EMBELLISHMENTS!
 |
| From Product Photos |
Have fun and let me know how your projects go, and if you have any other suggestions/recommendations as well, please let me know!
Travel adventure stories to come…where are The HenderBalz going now?
—————————————————————————————

G’Day! Henderbalz,
In addition to your post I was wondering, Innovation is the significant to progress and keeping buyers hooked to the most up-to-date products and services. Who would have thought the ‘idiot box like computer’ could change into a trend? And now that the flat panel Computer has been presented in the marketplace, it has practically replaced the desk and generated it further spacious. If just one have been to use the health and fitness analogy, it is striking-the excessive fat aged slob has been replaced with a smooth, slim observe that is so calme! The flat panel Laptop or computer is one particular of the biggest marketing gadgets in by going online shops. Techno-savvy end users have created it a scorching offering products. Thinking of its gains around its historic type it is a winner all the way. Flat panel can be of LCD or of Plasma. It is generally digital display screen. Signal will go immediately to the digital input of the exhibit makes sharper picture.
Regards
[…] Photo on Wood Projects […]
Thank you so much for this post! I can’t wait to try it. Another blog I read said this process would not work with color inkjet printed pictures. Obviously it seems you were able to successfully use a color picture. Any tips or tricks to that?
Thanks!
Just do not rub too hard when you are taking the “paper” off…as sometimes the color of the photo will come off too!
Good luck!